Connections
A connection is a data model entity which defines relations between users and servers. It enables controlling the access to the IT infrastructure. For more information on the data model, refer to the Data model topic.
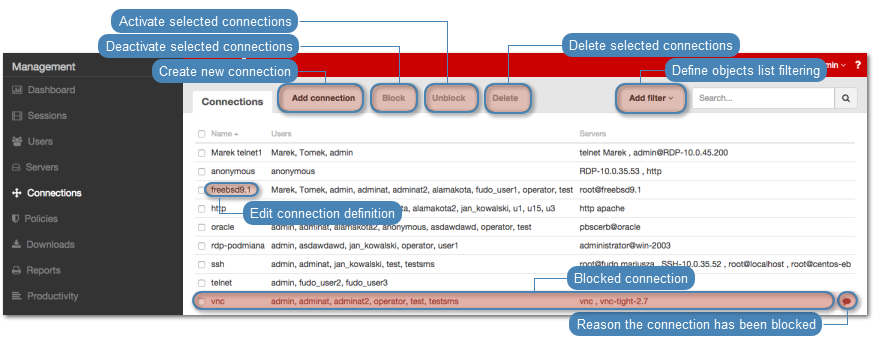
Connections configuration page
The connections configuration page allows defining new and editing existing connections.
To open connections configuration page, select > .
Note
anonymous is a specific connection type enabling monitoring access to servers defined as anonymous. When connecting to an anonymous server, FUDO does not authenticate the user against local database, but forwards login credentials to the destination server and after successful authentication, it continues recording the session.
Defining a connection
To define a connection, proceed as follows.
Warning
Data model objects: users, servers, bastions and connections are replicated within the cluster and object instances must not be added on each node. In case the replication mechanism fails to copy objects to other nodes, contact technical support department.
Note
The connection entity has to be unique for each user - server combination. FUDO will not allow creating a connection with a user - server combination already defined within a different connection.
- Select > .
- Click .
- Enter the connection name.
- Define administrator notification options.
| Option | Description |
|---|---|
| Session start | Administrator will receive an email notification when a user connects to a server defined in given connection. |
| Session finish | Administrator will receive an email notification when a user disconnects from a server. |
| Session join | Administrator will receive an email notification when someone joins user session. |
| Session leave | Administrator will receive an email notification when joining user leaves session. |
| Session policy match | Administrator will receive an email notification when FUDO detects pattern defined by the policy. For more information on policies refer to the Policies topic. |
Note
Notification settings are individual and are applied to the currently logged in user. For other users to be informed about events concerning a given connection, each has to log in and configure the notification settings individually.
Sending email notifications requires configuring an SMTP server. SMTP server configuration procedure is described in the Administration: Notifications topic.
- Select OCR sessions option to have RDP and VNC sessions fully indexed.
- Select the language of processed material.
- Select users allowed to connect to resources defined within the given connection.
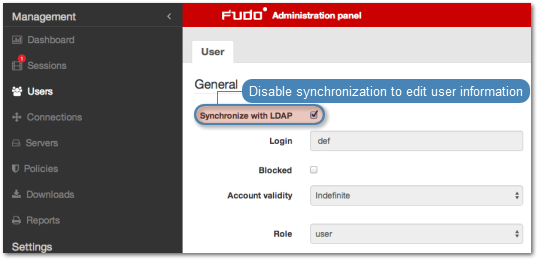
Note
The list does not include users synchronized with the LDAP service. To assign a connection to an LDAP synchronized user, define a group mapping in the LDAP synchronization properties or disable the synchronization option for the given user.
- Select session recording option.
| Option | Description |
|---|---|
| Complete | FUDO records network traffic allowing for future session playback, using the built in session player, as well as converting session material to a selection of video file formats. |
| Raw traffic only | FUDO keeps records of the data exchanged between the user and the monitored server. The raw data can be downloaded later on but the session cannot be played back using the built in session player. |
| Disabled | FUDO only takes note of the fact that the give session took place but does not record the data exchanged between the user and the server. |
- Define how long sessions will be stored before being automatically deleted.
Note
Retention parameter value, overrides the global retention value defined in the backup and retention configuration settings. For more information refer to the Backups and retention topic.
- Optionally, define time policies.
- Select RDP, SSH and VNC features available to users connecting to servers through this connection.
| Option | Description |
|---|---|
| RDP Functionality | |
| Clipboard redirection | Feature allowing to copy and paste text between local computer and remote system using clipboard. |
| Sound redirection | Allows playing sounds from remote system on local machine. |
| Device redirection | Enables using devices (printers, CD drives, Plug and Play devices, etc.) connected to remote host as well as accessing mapped network drives. |
| Dynamic virtual channels | Extensions enabling implementing additional in RDP connections. |
| Audio input redirection | Local audio input redirection to remote system. |
| Multimedia redirection | Enables processing media stream on local machine, allowing to lower remote server load and session data transfer. |
| Maximum RDP sessions resolution | Enables limiting RDP sessions resolution to selected value. |
| SSH Functionality | |
| Sessions | Establishing SSH connections with remote servers. |
| Port forwarding | Local and remote SSH connection tunneling. |
| Terminal | Establishing SSH connections using terminal. |
| Environment | Access to remote system’s environment. |
| X11 | Running graphical applications on remote host. |
| SSH Agent forwarding | Forwarding key by the SSH agent in a chain of subsequent SSH connections. |
| Shell | Ability to execute shell commands. |
| SCP | Ability to copy files over SSH connection. |
| VNC Functionality | |
| Client Cut Text | Clipboard support on client system. |
| Server Cut Text | Clipboard support on server side. |
- Select users allowed to manage the given object.
Note
Only users with the admin or the operator role are listed. Refer to the Security topic for additional information on user permissions.
- Select the destination server from the Server drop-down list.
Note
The list does not contain anonymous servers. Anonymous servers are automatically added to the anonymous connection.
- Assign defined policies in the Policy multiple choice input field.
Note
Policies are definitions of patterns which occurrence can result in terminating connection, blocking given user and notifying system administrator. Refer to the Policies topic for more information on defining patterns and policies.
- Define user authentication mode and define user authentication details. For details refer to Users authentication modes.
Note
MySQL and external password repositories
In case passwords to a MySQL server is retrieved from an external password repository, FUDO sends requests which are a combination of the username and the IP address.
username@user_ip_address, in case of anonymous server.usernamen@fudo_ip_address_bind_to_mysql_host, in case of proxied connections.username@'%', in case none of the above definitions had been found in the repository.
In case the external repository fails to respond to all of the requests, FUDO will report user authentication failure.
Note
Server objects in Thycotic repository
In case the substituted password comes from the Thycotic server, objects’ names (secrets) defined on the Thycotic server must be a combination of the host’s name (as defined on FUDO) and username separated by \, i.e. server_name\username.
Note
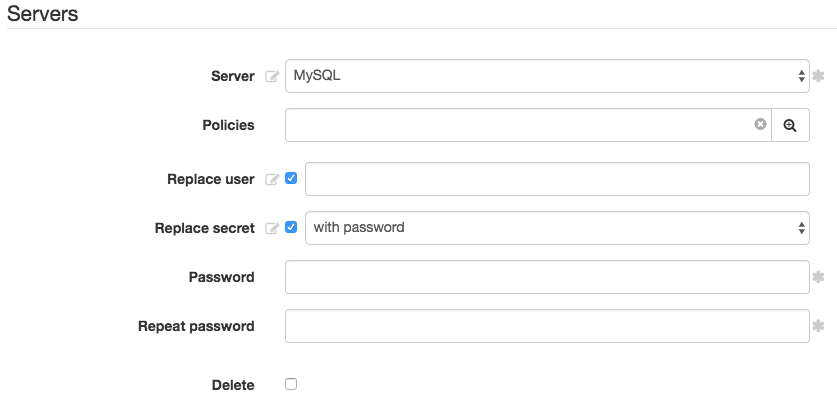
Two-fold authentication
With two-fold authentication enabled, user is being prompted twice for login credentials. Once for authenticating against FUDO and once again for accessing target system.
To enable two-fold authentication, proceed as follows.
- Select the Replace user option and leave the replacement login field empty.
- Select the Replace secret option.
- Leave the Password and the Repeat password fields empty.
- Enter domain name (applicable to MS SQL servers) to authenticate user connections using NTLM mechanism. Leaving domain parameter blank will result in database’s native authorization mechanism being used.
- Click to add more servers to given connection.
- Click .
Editing a connection
To modify a connection, proceed as follows.
- Select > .
- Find desired connection definition.
- Click connection name to open object configuration form.
- Modify configuration parameters as needed.
Note
Unsaved changes are marked with an icon.
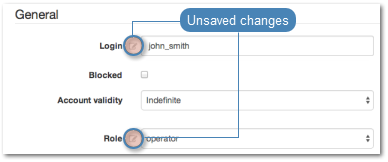
- Click .
Blocking and unblocking a connection
To block/ unblock access to servers defined within given connection, proceed as follows.
Warning
Blocking a connection will terminate all current connections to servers defined within given connection.
- Select > .
- Find and select desired connection definition.
- Click to block access to resources defined within given connection.
- Provide reason for blocking given object and click the .
Deleting a connection
To delete a connection definition, proceed as follows.
Warning
Deleting a connection definition will terminate all current connections to servers defined within the given connection.
- Select > .
- Find and select desired connection definition.
- Click .
- Confirm deletion of selected connections.
Related topics: